Introduction
Gender detection from facial photos is likely one of the many desirable purposes of pc imaginative and prescient. On this challenge, we mix OpenCV for confront location and the Roboflow API for gender classification, making a tool that identifies faces, checks them, and predicts their gender. We’ll make the most of Python, significantly in Google Colab, to kind in and run this code. This direct offers an easy-to-follow walkthrough of the code, clarifying every step so you possibly can perceive and apply it to your ventures.
Studying Goal
- Perceive methods to implement face detection utilizing OpenCV’s Haar Cascade.
- Learn to combine Roboflow API for gender classification.
- Discover strategies to course of and manipulate photos in Python.
- Visualize detection outcomes utilizing Matplotlib.
- Develop sensible abilities in combining AI and pc imaginative and prescient for real-world purposes.
This text was revealed as part of the Information Science Blogathon.
Find out how to Detect Gender Utilizing OpenCV and Roboflow in Python?
Allow us to discover ways to implement OpenCV and Roboflow in Python for gender detection:
Step 1: Importing Libraries and Importing Picture
The first step is to consequence the very important libraries. We’re using OpenCV for image preparation, NumPy for coping with clusters, and Matplotlib to visualise the comes about. We additionally uploaded a picture that contained faces we wished to investigate.
from google.colab import recordsdata
import cv2
import numpy as np
from matplotlib import pyplot as plt
from inference_sdk import InferenceHTTPClient

# Add picture
uploaded = recordsdata.add()

# Load the picture
for filename in uploaded.keys():
    img_path = filename
In Google Colab, the recordsdata.add() work empowers shoppers to switch information, equivalent to footage, from their neighborhood machines into the Colab surroundings. Upon importing, the image is put away in a phrase reference named transferred, the place the keys examine to the document names. A for loop is then used to extract the file path for additional processing. To deal with picture processing duties, OpenCV is employed to detect faces and draw bounding bins round them. On the identical time, Matplotlib is utilized to visualise the outcomes, together with displaying the picture and cropped faces.
Step 2: Loading Haar Cascade Mannequin for Face Detection
Subsequent, we stack OpenCV’s Haar Cascade demonstration, which is pre-trained to establish faces. This mannequin scans the picture for patterns resembling human faces and returns their coordinates.
# Load the Haar Cascade mannequin for face detection
face_cascade = cv2.CascadeClassifier(cv2.information.haarcascades + 'haarcascade_frontalface_default.xml')
It’s normally a prevalent technique for object detection. It identifies edges, textures, and patterns related to the item (on this case, faces). OpenCV offers a pre-trained face detection mannequin, which is loaded utilizing `CascadeClassifier.`
Step 3: Detecting Faces within the Picture
We stack the transferred image and alter it to grayscale, as this makes a distinction in making strides in confronting location exactness. Afterward, we use the face detector to search out faces within the picture.
# Load the picture and convert to grayscale
img = cv2.imread(img_path)
grey = cv2.cvtColor(img, cv2.COLOR_BGR2GRAY)

# Detect faces within the picture
faces = face_cascade.detectMultiScale(grey, scaleFactor=1.1, minNeighbors=5, minSize=(30, 30))- Picture Loading and Conversion:
- Make the most of cv2.imread() to stack the transferred image.
- Change the image to grayscale with cv2.cvtColor() to decrease complexity and improve discovery.
- Detecting Faces:
- Use detectMultiScale() to search out faces within the grayscale picture.
- The operate scales the picture and checks completely different areas for face patterns.
- Parameters like scaleFactor and minNeighbors modify detection sensitivity and accuracy.
Step 4: Setting Up the Gender Detection API
Now that we’ve detected the faces, we initialize the Roboflow API utilizing InferenceHTTPClient to foretell the gender of every detected face.
# Initialize InferenceHTTPClient for gender detection
CLIENT = InferenceHTTPClient(
    api_url="https://detect.roboflow.com",
    api_key="USE_YOUR_API"
)

The InferenceHTTPClient simplifies interplay with Roboflow’s pre-trained fashions by configuring a consumer with the Roboflow API URL and API key. This setup permits requests to be despatched to the gender detection mannequin hosted on Roboflow. The API key serves as a singular identifier for authentication, permitting safe entry to and utilization of the Roboflow API.
Step 5: Processing Every Detected Face
We loop by means of every detected face, draw a rectangle round it, and crop the face picture for additional processing. Every cropped face picture is quickly saved and despatched to the Roboflow API, the place the gender-detection-qiyyg/2 mannequin is used to foretell the gender.
The gender-detection-qiyyg/2 mannequin is a pre-trained deep studying mannequin optimized for classifying gender as male or feminine primarily based on facial options. It offers predictions with a confidence rating, indicating how sure the mannequin is in regards to the classification. The mannequin is educated on a strong dataset, permitting it to make correct predictions throughout a variety of facial photos. These predictions are returned by the API and used to label every face with the recognized gender and confidence degree.
# Initialize face rely
face_count = 0

# Record to retailer cropped face photos with labels
cropped_faces = []

# Course of every detected face
for (x, y, w, h) in faces:
    face_count += 1
    # Draw rectangles across the detected faces
    cv2.rectangle(img, (x, y), (x + w, y + h), (255, 0, 0), 2)

    # Extract the face area
    face_img = img[y:y+h, x:x+w]

    # Save the face picture quickly
    face_img_path="temp_face.jpg"
    cv2.imwrite(face_img_path, face_img)

    # Detect gender utilizing the InferenceHTTPClient
    consequence = CLIENT.infer(face_img_path, model_id="gender-detection-qiyyg/2")

    if 'predictions' in consequence and consequence['predictions']:
        prediction = consequence['predictions'][0]
        gender = prediction['class']
        confidence = prediction['confidence']

        # Label the rectangle with the gender and confidence
        label = f'{gender} ({confidence:.2f})'
        cv2.putText(img, label, (x, y - 10), cv2.FONT_HERSHEY_SIMPLEX, 0.8, (255, 0, 0), 2)

        # Add the cropped face with label to the checklist
        cropped_faces.append((face_img, label))
For every acknowledged face, the system attracts a bounding field utilizing cv2.rectangle() to visually spotlight the face within the picture. It then crops the face area utilizing slicing (face_img = img[y:y+h, x:x+w]), isolating it for additional processing. After quickly saving the cropped face, the system sends it to the Roboflow mannequin through CLIENT.infer(), which returns the gender prediction together with a confidence rating. The system provides these outcomes as textual content labels above every face utilizing cv2.putText(), offering a transparent and informative overlay.
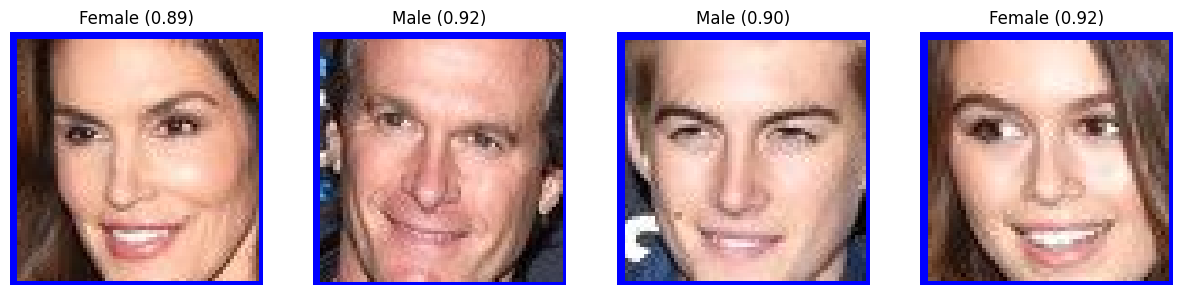
Step 6: Displaying the Outcomes
Lastly, we visualize the output. We first convert the picture from BGR to RGB (as OpenCV makes use of BGR by default), then show the detected faces and gender predictions. After that, we present the person cropped faces with their respective labels.
# Convert picture from BGR to RGB for show
img_rgb = cv2.cvtColor(img, cv2.COLOR_BGR2RGB)

# Show the picture with detected faces and gender labels
plt.determine(figsize=(10, 10))
plt.imshow(img_rgb)
plt.axis('off')
plt.title(f"Detected Faces: {face_count}")
plt.present()

# Show every cropped face with its label horizontally
fig, axes = plt.subplots(1, face_count, figsize=(15, 5))
for i, (face_img, label) in enumerate(cropped_faces):
    face_rgb = cv2.cvtColor(face_img, cv2.COLOR_BGR2RGB)
    axes[i].imshow(face_rgb)
    axes[i].axis('off')
    axes[i].set_title(label)
plt.present()
- Picture Conversion: Since OpenCV makes use of the BGR format by default, we convert the picture to RGB utilizing cv2.cvtColor() for proper shade show in Matplotlib.
- Displaying Outcomes:
- We use Matplotlib to show the picture with the detected faces and the gender labels on prime of them.
- We additionally present every cropped face picture and the expected gender label in a separate subplot.
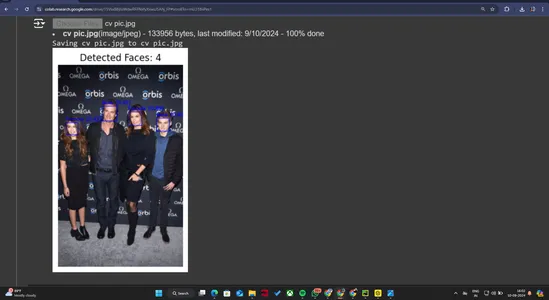
Unique information
Output Outcome information
Conclusion
On this information, we’ve efficiently developed a robust Gender Detection with OpenCV and Roboflow in Python. By implementing OpenCV for face detection and Roboflow for gender prediction, we created a system that may precisely establish and classify gender in photos. The addition of Matplotlib for visualization additional enhanced our challenge, offering clear and insightful shows of the outcomes. This challenge highlights the effectiveness of mixing these applied sciences and demonstrates their sensible advantages in real-world purposes, providing a strong answer for gender detection duties.
Key Takeaways
- The challenge demonstrates an efficient strategy to detecting and classifying gender from photos utilizing a pre-trained AI mannequin. The demonstration exactly distinguishes sexual orientation with tall certainty, displaying its unwavering high quality.
- By combining gadgets equivalent to Roboflow for AI deduction, OpenCV for image preparation, and Matplotlib for visualization, the enterprise successfully combines completely different improvements to comprehend its aims.
- The system’s capability to tell apart and classify the gender of various folks in a single image highlights its vigor and suppleness, making it acceptable for numerous purposes.
- Utilizing a pre-trained demonstration ensures tall exactness in forecasts, as confirmed by the knowledge scores given throughout the coming about. This accuracy is essential for purposes requiring dependable gender classification.
- The challenge makes use of visualization methods to annotate photos with detected faces and predicted genders. This makes the outcomes extra interpretable and helpful for additional evaluation.
Additionally Learn: Named Primarily based Gender Identification utilizing NLP and Python
Ceaselessly Requested Questions
A. The challenge goals to detect and classify gender from photos utilizing AI. It leverages pre-trained fashions to establish and label people’ genders in pictures.
A. The challenge utilized the Roboflow gender detection mannequin for AI inference, OpenCV for picture processing, and Matplotlib for visualization. It additionally used Python for scripting and information dealing with.
A. The mannequin analyzes photos to detect faces after which classifies every detected face as male or feminine primarily based on the educated AI algorithms. It outputs confidence scores for the predictions.
A. The mannequin demonstrates excessive accuracy with confidence scores indicating dependable predictions. For instance, the arrogance scores within the outcomes have been above 80%, exhibiting sturdy efficiency.
The media proven on this article just isn’t owned by Analytics Vidhya and is used on the Writer’s discretion.
I am Soumyadarshani Sprint, and I am embarking on an exhilarating journey of exploration throughout the charming realm of Information Science. As a devoted graduate pupil with a Bachelor’s diploma in Commerce (B.Com), I’ve found my ardour for the enthralling world of data-driven insights.
My dedication to steady enchancment has garnered me a 5⭐ score on HackerRank, together with accolades from Microsoft. I’ve additionally accomplished programs on esteemed platforms like Nice Studying and Simplilearn. As a proud recipient of a digital internship with TATA by means of Forage, I am dedicated to the pursuit of technical excellence.
Ceaselessly immersed within the intricacies of complicated datasets, I get pleasure from crafting algorithms and pioneering creative options. I invite you to attach with me on LinkedIn as we navigate the data-driven universe collectively!